Fall Cowl

If you remember a few posts ago  I had spun some yarn using the fractal spinning method. I just finished knitting this yarn up into a cowl. The pattern is Stacked Eyelet Cowl by Ami Madison. I ended up making it too small at first and had to rip it out and start again with more stitches and bigger needles. Here is the pre-blocking picture:

20130922-162631.jpg


and post-blocking:

20130922-162653.jpg


I think that the colors turned out pretty interesting and will most likely be trying this fractal plying method again in the future.

The cowl is long enough that I can either loop it around my neck once or twice, I am pretty excited that the weather is finally cooling down enough that I will be able to wear it soon!

20130922-162704.jpg 20130922-162712.jpg


Lily was very interested in what I was doing and decided to be in the pictures as well.

20130922-162717.jpg


She's even a pretty good model!

20130922-163126.jpg

Clogs

I have been planning to make felted clogs for a while but due to my past history with felting (not good...) I have been hesitant to try. I can't remember which of us brought it up, but Jason mentioned that he would like some felted clogs for this winter. So, I ordered some Knit Picks Wool of the Andes worsted weight yarn and bought the pattern. The way they work is that you knit really huge slippers then put them in the washing machine with hot water to shrink them. I made a pair for myself first as the tester pair before making a pair for Jason.

Here is my pair before felting:

20130831-100038.jpg

20130831-100045.jpg

20130831-100053.jpg

And after felting:

20130831-100103.jpg

20130831-100121.jpg

You may have noticed that the colors are different on the inside of each clog. This is because I messed up the amounts when I ordered the yarn. You need about 2/3 the total amount of yarn for the soles and top rim and 1/3 for the foot. I got this backward and ran out of brown yarn by the inner sole of the second slipper. Fortunately they look exactly the same except if you were to actually look inside them.

We were both quite shocked by the size of Jason's clogs prior to felting! They were so huge that I could fit both my feet into one of them with plenty of room to spare.

Here are the before pics with an iphone and Jason's feet for size reference:

20130831-100130.jpg

20130831-100140.jpg

After felting they fit him perfectly:

20130831-100150.jpg

20130901-205037.jpg

Now we will both have cozy feet this winter!

Madelynne is here!

This month I became an aunt, and I am so excited! My niece Madelynne was born on August 5th and is the cutest little baby ever. 20130818-142809.jpg

I told my brother and sister-in-law that I was going to be the crazy aunt who always sends knit and crochet stuff. They seemed ok with this, so I thought I should get started early.

When I first found out that my SIL was pregnant I asked for requests and if it was going to be a girl she had a crochet flower pattern in mind. (The pattern can be found here: http://www.etsy.com/listing/89500561/crochet-pattern-floral-baby-blanket).

I decided to go with yarn from knitpicks. Comfy (75% cotton, 25% acrylic) seemed to be a good choice as it is soft and machine washable. My SIL chose the colors to match bedding that they already had. She chose "Whisker," "Honeydew" and "Lilac Mist" for the flowers  and "Ivory" for the middle of each flower. I'm not sure if they ended up matching the existing bedding exactly, but it is really hard to match colors off a computer screen when you can't see the yarn in person.

20130802-123319.jpg

Slowly the blanket grew from one flower into a blanket.

20130802-123329.jpg

20130818-130537.jpg

20130818-130259.jpg

20130802-123401.jpg

Hopefully little Maddy enjoys many years of snuggling with her flower blanket! (She has more knits on the way but her parents haven't seen them yet so I will wait until later to post them.)

20130802-123412.jpg

Fractal Spinning

I've had this wool for a long time. Well over a year. I loved the colors so much that I didn't want to mess it up by spinning it wrong, so I just didn't spin it. I recently heard about fractal spinning and decided that this would be the perfect wool to try this technique. 20130602-222115.jpg

20130602-222121.jpg

To do this, I first split split the roving in half. I saved half and spun the other half just as it was. This makes really long stripes of color. Once that was spun onto one bobbin I went back to the other half and split it in half again, but lengthwise this time. This makes the colors form much shorter stripes. Then I plied the two singles together into a skein that looks like this:

20130602-222131.jpg

It should have some interesting striping patterns once it is knit up, though. Not sure what it will become yet. Maybe a hat? I'll be sure to post pictures when it becomes something!

Oh, and Lily says "Hi"!

20130602-222245.jpg

Experimental Yarn

A few weeks ago I decided to dye some wool. I had my soon-to-be-born niece in mind here when I picked the colors. I broke the fiber into pieces to start off with. The majority was in one piece, then 3 much smaller pieces. I decided to go with purple for the main color then teal, pink and yellow for the mix-in colors. I knew that I wanted to try to use my drum carder to blend the colors. Other than that I was completely winging it here. 20130601-175251.jpg

The dye did not take evenly at all. In fact, there were so many white spots in the purple wool that I dyed it again. To even out the color I decided to try running each color through the drum carder a few times.

20130601-175215.jpg

Which worked pretty well.

20130601-175223.jpg

Then it was time to try mixing the colors together. I evenly divided all of the colors into 6 sections and made 6 bats by randomly picking a color and running it through the carder.

20130601-175235.jpg

Then I randomly chose a bat and started spinning. I was able to fit 3 bats onto 1 bobbin, 3 onto another and then plied them together onto the third bobbin.

20130601-175241.jpg

Didn't turn out exactly how I expected (although I really didn't have much of an expectation to begin with). I was going for a darker purple and lighter yellow, but too late now. I think it might be ok for a baby jacket or something. We'll see...

20130601-175156.jpg

Woolee Winder

My newest fiber toy is an attachment for my spinning wheel called a WooLee Winder. Most wheels come with a flyer like the one in the picture below with little hooks all around edge. To wind the yarn evenly on to the bobbin you need to move it down the hooks every few minutes. 20130602-212511.jpg

But, the WooLee winder is different. It's hard to see in this picture, but there is one loop that the yarn goes through. This loop moves back and forth along the length of the bobbin. This results in yarn that is very evenly distributed along the bobbin.

20130601-174952.jpg

This mechanism works because there is a gear on the flyer that aligns with the one on the bobbin.

20130601-174947.jpg

As the bobbin turns, the gear on the flyer turns which controls the movement of the loop up and down the bobbin.

20130601-174942.jpg

This means that you save time by not having to stop spinning every few minutes to move the yarn onto a new hook. Also, with such evenly distributed yarn (along with the slightly bigger bobbins) you can fit a whole lot more yarn on to one bobbin.

So far I really like it. I have spun up 2 skeins of yarn. It did take a little while for me to get used to the tension of the woolee winder. It seems to add quite a bit of tension to the yarn. Once I figured this out and turned the tension on the wheel itself almost all the way down I was good to go.

The first yarn was one that I dyed a while ago with kool-aid. It is Tesswater wool from my Paradise Fibers fiber club a while back. I divided the roving in half and dyed half with cherry and the other half with grape. (Must have forgotten to take a picture of the grape half. Oops.)

20130601-175100.jpg

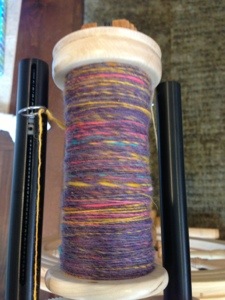
Here they are spun into singles. There are 2 oz of fiber on each bobbin with plenty of room to spare.


20130601-175107.jpg

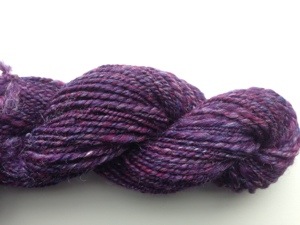
I then plied them together. The picture is a little washed out but you get the idea.

20130602-213030.jpg


Roving to Yarn

More Spinning. I love watching how the color changes from roving to yarn. This one started off with chunks of blue, maroon and shiny silk. 20130414-133310.jpg


It ended up looking purple. (Especially if you see it from a distance.)

20130414-133321.jpg

20130414-133328.jpg


The next one had all kinds of colors mixed in. Greens, blues, grays...


20130414-133345.jpg


It also had an intermediate step that I usually try to avoid while spinning. This step was called "Lily goes nuts." I thought she was being a good puppy chewing on one of her toys. Turns out she got a hold of a chunk of roving and tried to pull it apart. Much like she does with stuffing in stuffed animals.

20130414-133352.jpg


Turned out alright in the end. This one might even become a "Lilliput Yarn." Seems fitting since she even "helped" make it!


20130414-133948.jpg

20130414-133953.jpg

After

My craft room is mostly set up and I love it! I got a desk from Ikea that fits in the corner. It's hard to see, but in the back corner of the desk I have my swift set up with the ball winder on the edge behind the chair. I am also able to keep my sewing machine out. It used to live on the top shelf of a closet which means I never used it. Maybe now that it's more accessible I will actually sew once in a while. 20130404-184047.jpg

Behind the desk is my bookshelf/yarn shelf. On top of this I have my drum carder, drop spindle and all of the knitting needles that I got from my grandma last time I visited.

20130404-184057.jpg

The closet has the majority of my yarn. The black container to the left of the closet holds all of my spinning fiber.

20130404-184124.jpg

It's great having so much room for all my crafting stuff. I could pretty much hang out in this room all the time. :)

Orcas are awesome!

Since I was about 7 years old I have been in love with orcas. It all started with a trip to Sea World. Growing up, I had many stuffed orcas, orca print pillows, even a border of orcas around my bedroom wall. So, I was pretty excited when my favorite designer of crocheted stuffed animals released an orca pattern yesterday. You can read all about the pattern on her website, Planet June. Just like her other patterns, you make pieces and sew them together. In this case there is the body, tail, dorsal fin and two fins.

20130327-204050.jpg

The color changes really weren't too bad to crochet and the end product looks great.

20130327-204100.jpg

Here's a shot of the color changes along the belly:

20130327-204109.jpg

A long time ago I found an orca pattern that I crocheted, but I really didn't like how it turned out. (In fact it now belongs to Lily and she loves walking around the house with her orca in her mouth.) It was made in pieces also, but this one involved making the white areas separately and sewing them onto the body of the orca, I didn't like how this looked, and wasn't a big fan of the fin shaping. Here you can see the old one on the left and the new one on the right.

20130327-204133.jpg

Again, old one on top, new on bottom. I love how nice and smooth the color changes look on the new orca.

20130327-204138.jpg

Now Lily can have her crocheted orca and I can have my own. :) (Along with a few others.)

20130327-204143.jpg

Springtime Socks and Spinning

We've had some great spring weather around here lately. Warm and sunny and I've been doing lots of spinning. The skein that I just finished started off as this 85% merino, 15% silk roving. 20130318-115325.jpg

It's interesting that the roving had separate chunks of red and blue but once it's spun it looks purple.

20130318-115333.jpg

The silk makes it shiny and it's really soft. I like how it turned out. I'm now spinning some corridale which I will have pictures of once it's all spun.

Recently I also finished some socks. This is a stitch pattern from Charlene Schurch's book Sensational Knitted Socks. I used the stitch pattern for the top of the foot and leg but used my own toe and a short row heel.

20130318-115304.jpg

Here you can see the stitch pattern in a little more detail:

20130318-115314.jpg

The only thing I would change if I were to do this pattern again would be to use a more solid colored yarn. I think this would make the cables show up a little better. They kind of blend in with the stripes of color in this sock.

I also finished these socks a while ago but only just got around to taking a picture of them. They are just plain socks knit from the toe up.

20130318-115251.jpg

And, because I can't resist, here is a picture of a silly pup known as Lily waiting for the ball to be thrown at the dog park. She loves springtime, too.

20130318-115406.jpg

Rose City Yarn Crawl

This past weekend was the Rose City Yarn Crawl. The yarn crawl involves visiting 18 Portland area shops in 4 days (Thursday-Sunday). I was able to hit a few Thursday and Friday after work, but I hit most of the shops this weekend. My husband came along for the ride on Saturday and we hit 10 shops. I hit the rest on Sunday. You print out a passport to take to all the shops to get stamped. Once your passport is full you turn it in to the last shop you visit and are entered into a prize drawing. Ever since we moved to Portland I have wanted to visit all of these yarn shops, but hadn't made it to most of them. So, the yarn crawl was the perfect opportunity to see all the yarn shops in the area.

I ended up with a good bit of new yarn and fiber.


20130303-205230.jpg

20130303-205213.jpg


Clockwise from top to bottom:

  • Mountain Colors Hand-painted yarn in the Harmony Sweet Grass colorway
  • Debbie Bliss ecobaby in Brown and Denim colorways
  • Sweetgeorgia sock yarn in the Boheme colorway
  • Madeline Tosh Vintage in Teddy Bear
  • Blue Moon Socks that Rock in Aurora Borealis
  • Woolgatherings fiber 70% BFL / 30% Seacell

I am super excited about all of these yarns. With the exception of Madeline Tosh I have never knit with any of these brands before so they are all new to me.

This year they even had a tote bag that you could take from shop to shop and pick up a pin for each shop you visit.

20130303-205219.jpg


I had an awesome time participating in the yarn crawl and can't wait to do it again next year!


My Little Helper

I am almost done with the little baby top that I showed you last time I posted - it just needs buttons. Yesterday I washed it and pinned it out to dry. 20130224-182244.jpg 20130224-182316.jpg

(The picture of the back side is more true to color than the first picture.)

Lily was very interested in the whole process and especially liked the smell of the wet wool. It made me laugh that, while I went to work on other things, she stayed by the sweater. She just liked to lay next to it like she was helping it to dry or something.

20130224-182259.jpg 20130224-182251.jpg

She kept getting up, walking around, then going back to the sweater. What a funny little dog!

While she was "helping" the sweater to dry, I was winding some skeins of yarn into balls. (She loves to watch the ball winder, too.)

I got them all wound, and here's a sneak peak at my next project:

20130224-182310.jpg

Brainstorming

Thanks so much for all the great feedback on Lilliput Yarn! I hear that some of it has even sold already. Pretty exciting! In other news, I recently found out that I'm going to be an aunt! My brother and his wife are expecting a baby this August and I'm super excited! I can't stop looking at knitting and crochet patterns for everything baby (much to the annoyance of my husband). Blankets, hats, sweaters, you name it. So, I'm sure there will be much baby knitting happening soon, especially once they find out if it's a girl or a boy. If anyone out there has any favorite baby patterns feel free to share them with me.

I have also started a baby cardigan for someone else we know who recently had a baby girl. The pattern is in threes: a baby cardigan by Kelly Hendrich. I am using Pico Accuardi Dyworks yarn in the "Burnt Candy" colorway on size 8 needles.

20130212-200626.jpg


Last night I also got all my pictures framed that are going to go on the walls in my craft room. Along with the 4 shown below I have a huge picture of Paris that is black and white except for the Eiffel Tower which is lit up. I can't wait to finish getting my craft room set up and hang  my pictures.

20130212-200621.jpg


Lilliput Yarn

4/10/14 Edit: I have recently started dying some commercial sock yarn. Soon I will have an etsy shop named "Lilliput Yarn." Once my shop is all set up, this website (lilliputyarn.com) will re-direct to the shop.


I like to spin, but I have ended up with more yarn than I can knit in the near future. I have tried to sell it on my Etsy shop with no luck. The problem with selling something like yarn on Etsy is that people want to touch it and see the color in person. Luckily, the owner of  Black Sheep has agreed to sell some of my hand spun yarn in the shop.

I wanted to make up a cute label for the yarn, and what's cuter than a corgi puppy? So I decided to call it "Lilliput Yarn." (Lilliput is Lily's registered name and is a reference to the small people on the island of Lilliput in Gulliver's Travels.)

Lily and I had a little photo shoot. Many pictures were taken and this one was chosen:

DSCN3951

Next, my awesome husband offered to photoshop the picture to make it look like a drawing. He did a great job and his final product ended up on the label.

photo (3)

There are a total of 8 balls of yarn in a variety of materials (wool, silk, alpaca...) and weights.

20130207-182019.jpg 20130207-182025.jpg

Exciting!

Lily's First Christmas


This past Christmas was little Lily's first Christmas. (Yes, I realize that Christmas occurred an entire month ago and I am only just now posting this.) I decided that she needed to have a stocking to match the stockings that I made for Jason and myself a few years back. I used some old Red Heart Super Saver yarn that I have had hanging around since way back in high school. I just kind of winged the pattern. It's basically made like a sock that I would make for myself with a short row heel, but bigger yarn, bigger needles (I think I used US 6 needles) and a shorted foot section.


DSCN3908


The paw print was a free chart on Ravelry as was the snowflake pattern. For her name I used a cross-stitch program that I have. It doubles pretty well for making knitting charts. The hardest part in making this stocking was keeping Lily from helping. She seems to love yarn almost as much as I do - which isn't exactly a good thing.


20130126-174354.jpg


In the end, the whole family had matching stockings.

20130126-174527.jpg


I don't think Lily really cared about her stocking, though. She was having too much fun playing in the snow!

20130126-174429.jpg


Life is Like a Box of Chocolates

Hello, I'm back again! I don't know how long this posting more than once a week business is going to hold up, but I really want to get through some of this backlog of projects. Also, I have made some progress on that yarn that I dyed last week that didn't quite turn out as expected. This next project goes along with the falling leaves hat. When I was done with the hat I had a ball of yarn left over and thought I should make something to go along with the hat. Someone from the knitting group at my local yarn store (Black Sheep) was making some fingerless mittens that I really liked. The lace pattern doesn't match the hat, but the yarn does and I think they look just fine together.

DSCN3848

They are surprisingly warm considering the amount of holes in them. The pattern is called "Mericash wrist warmers" by Jean Gray and is free on Ravelry. (By the way, I'm crystalcrafts on Ravelry if anyone out there wants to check out my project pages.)

DSCN3850 DSCN3852

On another note, remember that roving from last week? I spun it and plied it into this:

20130121-192337.jpg 20130121-192352.jpg

I was not such a fan of the colors. I decided to make up a dye pot of dark blue (Wiltons royal with a little black) and throw it in. After round 1 of dye it looked like this (sorry for the bad picture):

20130121-192404.jpg

I still wanted it darker so I added more dark blue and put the yarn back in. Here's what it looks like now:

20130121-192419.jpg 20130121-192433.jpg

It's weird, but I can't decide if I like it. I definitely like it more now then how it was. I just don't know. Although, after getting a great response from my knitting group yesterday I'm feeling a little better about it. You just never know what you're gonna get when dying yarn.

Falling Leaves

Now that I am back to blogging, I am going to try something new. The idea of this blog was to be able to show family and friends (and anyone else that is interested) what I have been working on. As I finish projects I have been storing them in a "blog" folder on my desktop. I have accumulated quite a backlog of projects there. So, my idea is to post something that I am currently working on along with something that has been finished and sitting around waiting to be shown to you. For my "old" project this post, I will show you my Falling Leaves beret. This hat was designed by one of my favorite designers- Alana Dakos. She also does the "never not knitting" podcast and blog. This pattern comes from a book called Coastal Knits that she co-wrote with Hannah Fettig.

I used Kollage Yarns sock-a-licious in the Indian Rose colorway.

My pictures are not great, but I love this hat. I have never owned a beret before, but it is perfect for this area. It doesn't usually get cold enough to need a winter hat (with the exception of the last few days) but it still keeps the top of my head warm.

One fun thing about this hat is that to block it you stretch it around a dinner plate. Kind of interesting.

IMG_1039 IMG_1040

Ok, now back to my current spinning project. The roving from my last post is all dry and I have started spinning it. I just wish I had a picture of the look on my husbands face when I first showed him this roving (before he even saw the blog post about it). We both agree that it is not a very pretty sight. Although it seems that Lily still likes it as I just had to pull it out of her mouth while writing this post. I guess I left it a little too close to the edge of the table. She couldn't resist.

20130118-092218.jpg

Here is how it looks on the bobbin so far:

20130118-092227.jpg

The white really washes out the little bits of color that are there. I'm going to just keep spinning it, and probably make it 3-ply using the navajo plying method. Once it is all done and plied I will see what I think but right now the plan is to over dye the enitre skein. I'm thinking a darkish orange color, but I'm not sure so if anyone has any better ideas feel free to let me know!

Dye Oops!

Sorry I haven't posted in so long again! I really will start trying to post on a more regular basis. I thought today would be a good day to dye some roving that I've had sitting around for a while. It is 4 oz of a wool/bamboo/nylon mix. (I have discovered that it takes about 4 oz of fiber to spin up enough yarn for a pair of socks.) For a while I have been trying to decide what colors I wanted to use. This morning I decided to try something new and go with orange, brown and green. This part always scares me because there is no turning back with dying. You can unravel knitting but there is no turning the roving back to white. (Although sometimes you can over dye and get a decent result which I will show you in a later post.)

I decided to go with the slow cooker method so I put the roving in with some water and vinegar to soak for a while.

IMG_2156

While that was soaking I mixed up some Wiltons icing coloring to use as my dye.

IMG_2155

After waiting a little while I added them to the pot. Green first,

IMG_2157

then orange,

IMG_2158

and brown last.

IMG_2159

Not my personal favorite colors but it was looking like it would be promising. Especially once it was spun and all the colors kind of blended together. So, I put the lid on and let it sit for a while.

When it was time to take the roving out I felt really silly. I had just thought that the dye would make it all the way through to all of the roving. It didn't. So, now I essentially have a white roving with scattered chunks of green, orange and brown.

IMG_2160

At this point I feel like I have 2 options:

1: Just let it dry and spin it up. Maybe once it is spun and plied it will look ok?

2: Lay it out so that the colors match up again and hand paint it. This would make it more like what I was originally going for, but I don't know if it's worth it.

What would you do?